I recently upgraded my Cox internet from 1000mbit/35mbit to 2000mbit/100mbit. I already had a capable cable modem, an Arris S33. After upgrading I ran a speedtest and found I wasn’t getting any better than 1000mbit down.
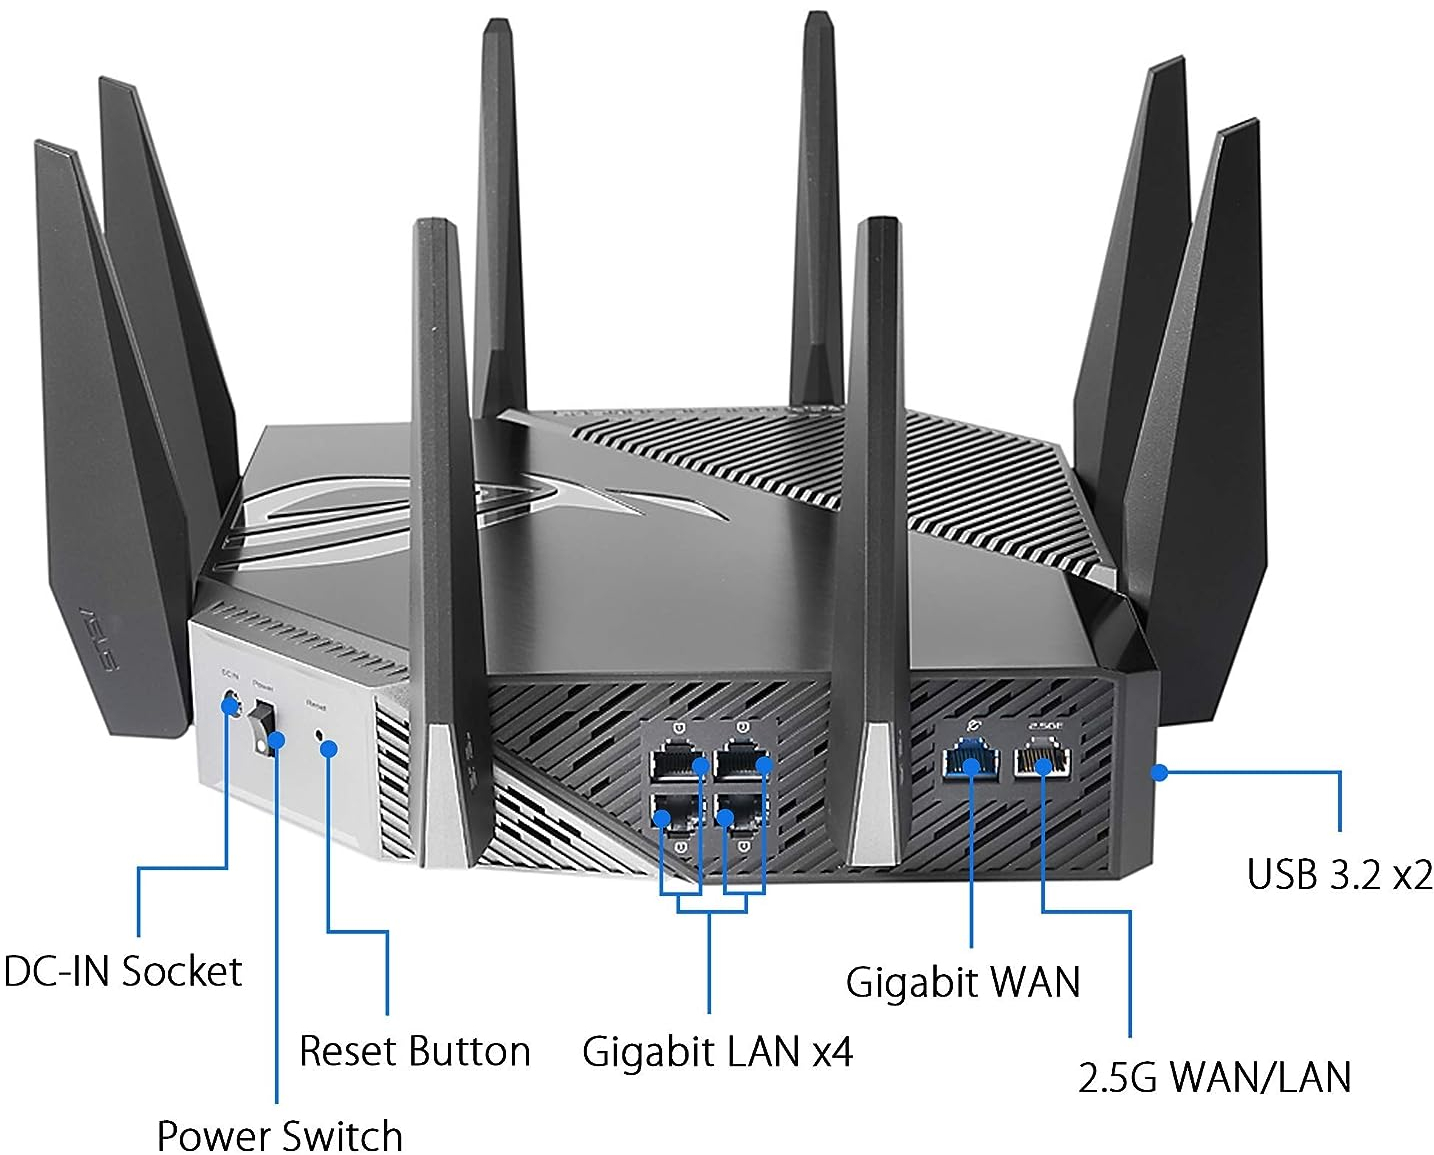
It quickly became obvious after some research why my internet seemed to be bottlenecked. My wireless router, a ASUS GT-AXE11000, has a 2.5gbit port, as does the cable modem. Yet the LAN side only has 1gbit ports.

My next thought was Oh, I just need to download from two computers at once, as in 1000mbit + 1000mbit = 2000mbit. Yet even trying to do both speedtests at once lead to them slowing each other down, and it always came out to around 1000mbit. Next I found the router itself has a built-in speedtest. I did this through the web interface, and it got around 1.2gbit. That was the first real sign that I was actually getting higher than my previous internet plan’s speeds.
It was clear my router was holding me back. So I quickly started researching mini-PCs on Amazon and YouTube. One of the most useful channels was ServeTheHome. Some of the ones I looked at were the Minisforum NAB6 and Minisforum NBP7. What I ended learning is these would work, but forms of support like tech support, bios updates, and maybe even warranties weren’t going to much of a thing with most mini-PCs.
I then decided that I likely wanted to instead buy a Intel NUC. I already own three NUCs, but they are all only have 1gbit ports. Here are the pros and cons of getting a NUC. I did also consider using my NAS as my router, but decided I didn’t want to take down the internet every time I rebooted the server.
Pros:
Small
Quiet
Relatively powerful
Quality
Reliable
Bios updates
Well supported by Linux
Future re-usablity
Cons:
Relatively expensive
Limited upgrade path
Intel is discontinuing NUCs
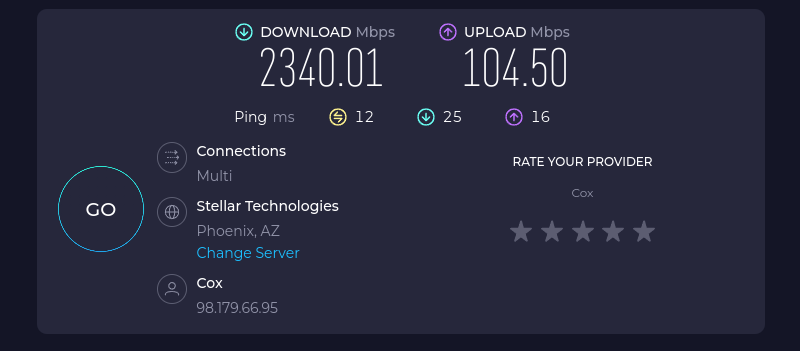
But before I spent all the money I wanted to validate if I could really get all the speed, or did I already have a cable modem or cable provider problem. So I next ordered a 2.5gbit PCI-E ethernet card from Amazon. I then put it in one of my desktops running Fedora Linux 38, and then connected the cable modem directly to it. I ran a speedtest and found I was getting about 2340mbit/104mbit. I also ordered a 2.5gbit USB adapter, tested it, and it too worked.


Now on to building a real replacement for the wireless router. I learned during my research that newer models of NUC have the option for B-key mini PCI-E cards. I found a 2.5gbit adapter designed for these models.
Router Parts:
1x Intel NUC 13 Pro NUC13ANHi5 Barebone System
1x Crucial RAM 32GB Kit (2x16GB) DDR4 3200MHz CL22 Laptop Memory
1x Crucial P3 Plus 2TB PCIe Gen4 3D NAND NVMe M.2 SSD
1x Intel NUCIOALUWS LAN & USB Add-On Assembly Accessory
Additional networking hardware parts:
1x QNAP 2.5gbit Ethernet Switch
1x 2.5GBase-T PCIe 3.1 Network Adapter with Intel I225-V
1x Plugable 2.5G USB C and USB to Ethernet Adapter
I put the memory, NVMe SSD, and NUCIOALUWS in the NUC. Note, don’t be like me and be careful with the connectors for the NUCIOALUWS. They are delicate. Also note which side is up on the ribbon cable. I ended up disconnecting the ribbon cable for the 2.5" SSD connector within the NUC. It was interfering with the ribbon cable for the NUCIOALUWS. Also be careful with the plastic clip holding the 2.5" SSD ribbon cable. It is delicate too, and easily lost.
I downloaded the a copy of the Fedora Linux 38 server x86_64 iso, and used dd if=Fedora-Server-dvd-x86_64-38-1.6.iso of=/dev/sda bs=20M to write it to a flash drive I had connected to my desktop. I moved the flash drive to the NUC. After connecting power, a keyboard, monitor, mouse, a ethernet cable, and the USB flash drive I turned it on, and proceeded to install Fedora Linux. That went smoothly, and it rebooted into Linux. I logged in as root, and starting getting it setup. I added biosdevname=0 net.ifnames=0 to GRUB_CMDLINE_LINUX="rhgb quiet" in /etc/default/grub to switch back to eth0 style network interface names. I ran grub2-mkconfig -o /boot/efi/EFI/fedora/grub.cfg to regenerate the grub.cfg to make the changes in /etc/default/grub take effect. I then rebooted it.
Next I used nmclito rename the NetworkManager interface names to match the actual network interface names, like nmcli connection modify Wired\ connection\ 1 con-name eth0and nmcli connection modify Wired\ connection\ 2 con-name eth1.
Side story, if you google Intel 2.5gbit adapters you will find all kinds of reports of problems with I225 and I226 adapters. You would also get a general impression that 2.5gbit is unreliable and flakey. I have seen such issues in the past, but today with Linux I am not experiencing any issues with 2.5gbit equipment I have.
Router:
lspci | grep Ethernet
56:00.0 Ethernet controller: Intel Corporation Ethernet Controller I226-V (rev 04)
57:00.0 Ethernet controller: Intel Corporation Ethernet Controller I226-V (rev 04)

ethtool eth0 2>&1 | grep -E 'Link|Speed'
    Speed: 2500Mb/s
    Link detected: yes

ethtool eth1 2>&1 | grep -E 'Link|Speed'
    Speed: 2500Mb/s
    Link detected: yes
Older Desktop:
lspci | grep Ethernet
00:1f.6 Ethernet controller: Intel Corporation Ethernet Connection (7) I219-V (rev 10)
05:00.0 Ethernet controller: Intel Corporation Ethernet Controller I225-V (rev 01)

ethtool eth0 2>&1 | grep -E 'Link|Speed'
    Speed: 2500Mb/s
    Link detected: yes
Newer Desktop:
lspci | grep Ethernet

07:00.0 Ethernet controller: Intel Corporation Ethernet Controller I226-V (rev 06)

ethtool eth0 2>&1 | grep -E 'Link|Speed'
    Speed: 2500Mb/s
    Link detected: yes
Back to the main story, now that I had the router NUC ready to configure as a router/NAT/Firewall it was time to start setting that up. I started by trying to use firewalld, but quickly found without lots of trial and error I wasn’t likely to get that working. I disabled firewalld with systemctl disable firewalld.service ; systemctl stop firewalld.service. Next I switched to a solution I have done many times before, going back decades literally. That solution is iptables. Within a few minutes I had that working. Within a few hours I had it mostly working as well as my wireless router had in general. By the next day I had it fully working.
There were two main issues that made it take longer. One that the ip address on the internet side is dynamic. Two I was running into some race conditions with systemd and the boot process that I had seen before. I ended up pulling the ip address with ifconfig eth0 | | grep 'inet ' | awk '{ print $2 }'. I solved the second problem with a while loop, see the code below. It basically once a second checks to see if the ip address is there yet, and once it finds the ip address it stops. It waits up to 30 seconds. I did attempt to switch from After=network.target to After=network-online.target in the systemd unit file, but it didn’t help.
While loop to overcome the race condition:
EXTERNAL_INTERFACE=eth0
INTERNAL_INTERFACE=eth1

I=0
LIMIT=30

while [ $I -le $LIMIT ]; do
  IFCONFIG_CMD="ifconfig $EXTERNAL_INTERFACE"
  $IFCONFIG_CMD >/dev/null 2>&1
  RC=$?
  if [ $RC -eq 0 ]; then
    EXTERNAL_IP=`$IFCONFIG_CMD | grep 'inet ' | awk '{ print $2 }'`
  fi

  if [ ! -z $EXTERNAL_IP ]; then
    echo $EXTERNAL_IP
    let I=$LIMIT
  fi

  sleep 1
  let I=I+1
done
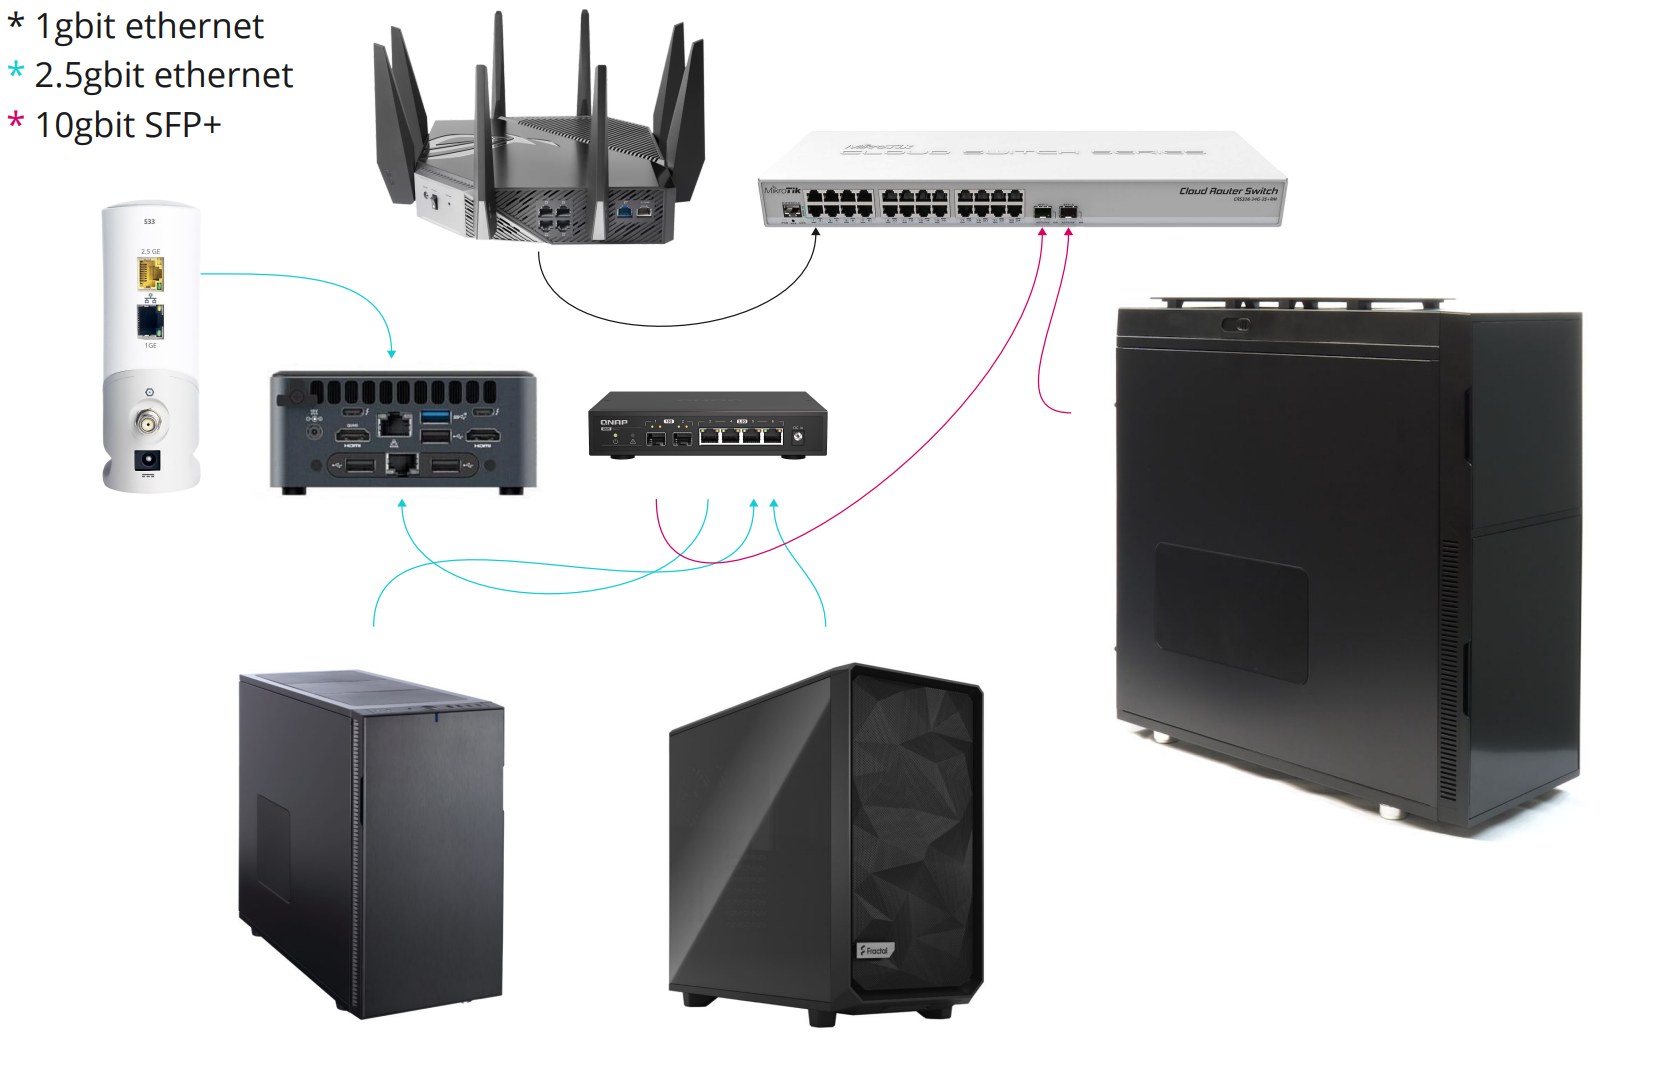
In the end I have a Linux router that provides full speed to my Linux desktops and Linux server. The wireless router got switched to access point mode.

A separate topic is DHCP and DNS. I could set these up via dhcpd and dnsmasq, but that is something I had already done on other computers.
Yes, I am aware there are many different ways of implementing this. This is the way I chose to do it.
Here is the full version of the script that includes iptables command for setting up masquerading aka NAT and port forwarding. Below is also the systemd service file. Be sure to run chmod 755 /usr/local/sbin/iptables.sh ; systemctl daemon-reload after writing these files.
/usr/local/sbin/iptables.sh:
#!/bin/bash

EXTERNAL_INTERFACE=eth0
INTERNAL_INTERFACE=eth1

I=0
LIMIT=30

while [ $I -le $LIMIT ]; do
  IFCONFIG_CMD="ifconfig $EXTERNAL_INTERFACE"
  $IFCONFIG_CMD >/dev/null 2>&1
  RC=$?
  if [ $RC -eq 0 ]; then
    EXTERNAL_IP=`$IFCONFIG_CMD | grep 'inet ' | awk '{ print $2 }'`
  fi

  if [ ! -z $EXTERNAL_IP ]; then
    echo $EXTERNAL_IP
    let I=$LIMIT
  fi

  sleep 1
  let I=I+1
done

INTERNAL_IP=192.168.1.40
METALLB_IP=192.168.1.45

INTERNAL_CIDR_BLOCK=192.168.1.0/24

DNS_PORT=53
DNS_PROTOCOL=tcp

HTTP_PORT=80
HTTP_PROTOCOL=tcp

HTTPS_PORT=443
HTTPS_PROTOCOL=tcp

IRC_PROXY_PORT=45000
IRC_PROXY_PROTOCOL=tcp

SSH_PORT=22
SSH_PROTOCOL=tcp

iptables -P FORWARD DROP
iptables -P INPUT DROP
# Restricts what protocols and ports can be used from the computer itself to the internet
iptables -P OUTPUT DROP

iptables -A FORWARD -p icmp -j ACCEPT
iptables -A FORWARD -m state --state RELATED,ESTABLISHED -j ACCEPT
iptables -A FORWARD -i $INTERNAL_INTERFACE -o $EXTERNAL_INTERFACE -j ACCEPT
iptables -A FORWARD -i $EXTERNAL_INTERFACE -o $EXTERNAL_INTERFACE -j REJECT
iptables -A FORWARD -p $HTTPS_PROTOCOL -d $METALLB_IP --dport $HTTPS_PORT -m state --state NEW,ESTABLISHED,RELATED -j ACCEPT
iptables -A FORWARD -p $IRC_PROXY_PROTOCOL -d $INTERNAL_IP --dport $IRC_PROXY_PORT -m state --state NEW,ESTABLISHED,RELATED -j ACCEPT

iptables -A INPUT -m state --state ESTABLISHED,RELATED -j ACCEPT
iptables -A INPUT -p icmp -i $EXTERNAL_INTERFACE -j ACCEPT
iptables -A INPUT -p icmp -i $INTERNAL_INTERFACE -j ACCEPT
iptables -D INPUT -p $SSH_PROTOCOL -i $EXTERNAL_INTERFACE --dport $SSH_PORT -j ACCEPT
iptables -A INPUT -p $SSH_PROTOCOL -i $INTERNAL_INTERFACE --dport $SSH_PORT -j ACCEPT

iptables -A OUTPUT -p icmp -j ACCEPT
iptables -A OUTPUT -p $DNS_PROTOCOL --dport $DNS_PORT -j ACCEPT
iptables -A OUTPUT -p $HTTP_PROTOCOL --dport $HTTP_PORT -j ACCEPT
iptables -A OUTPUT -p $HTTPS_PROTOCOL --dport $HTTPS_PORT -j ACCEPT
iptables -A OUTPUT -p $SSH_PROTOCOL --sport $SSH_PORT -m conntrack --ctstate ESTABLISHED -j ACCEPT

iptables -t nat -A POSTROUTING -o $EXTERNAL_INTERFACE -j MASQUERADE
iptables -t nat -A PREROUTING -d $EXTERNAL_IP -p $HTTPS_PROTOCOL --dport $HTTPS_PORT -j DNAT --to $METALLB_IP:$HTTPS_PORT
iptables -t nat -A PREROUTING -d $EXTERNAL_IP -p $IRC_PROXY_PROTOCOL --dport $IRC_PROXY_PORT -j DNAT --to $INTERNAL_IP:$IRC_PROXY_PORT

iptables -t nat -A POSTROUTING -o $EXTERNAL_INTERFACE -j MASQUERADE
iptables -t nat -A POSTROUTING -s $INTERNAL_CIDR_BLOCK -d $METALLB_IP -p $HTTPS_PROTOCOL --dport $HTTPS_PORT -j MASQUERADE
iptables -t nat -A POSTROUTING -s $INTERNAL_CIDR_BLOCK -d $INTERNAL_IP -p $IRC_PROXY_PROTOCOL --dport $IRC_PROXY_PORT -j MASQUERADE
/etc/systemd/system/iptables.service:
[Unit]
Description=iptables
After=local-fs.target
After=network-online.target

[Service]
ExecStart=/usr/local/sbin/iptables.sh
RemainAfterExit=true
Type=oneshot

[Install]
WantedBy=multi-user.target